
Haunted Legends: Monstrous Alchemy Walkthrough
05/03/2018
Welcome to the Haunted Legends: Monstrous Alchemy Walkthrough
Embark on a secret mission to save Princess Isabella!
Whether you use this document as a reference when things get difficult or as a road map to get you from beginning to end, we’re pretty sure you’ll find what you’re looking for here.
This document contains a complete Haunted Legends: Monstrous Alchemy game walkthrough featuring annotated screenshots from actual gameplay!
We hope you find this information useful as you play your way through the game. Use the walkthrough menu below to quickly jump to whatever stage of the game you need help with.
Remember to visit the Big Fish Games Forums if you find you need more help. Have fun!
This walkthrough was created by Chrissi and Kristofer Ducotey, and is protected under US Copyright laws. Any unauthorized use, including re-publication in whole or in part, without permission, is strictly prohibited.
Kristofer Ducotey
https://www.bigfishgames.com/blog/walkthrough/haunted-legends-monstrous-academy-strategy-guide-hints-cheats-codes-tips-tricks/
- Search (S).
- Move (T) to (U); place SHIP (U); take TOOLS EMBLEM.
- TOOLS EMBLEM on TOOLBOX; take SOLVENT and SCREWDRIVER.
- Solution (V): 1-2-3-4.
- Find NEEDLE.
- Walk down.
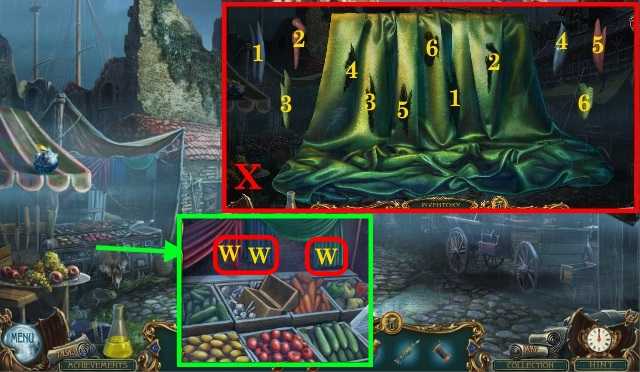
- Use SCISSORS (W); receive PIECES OF CLOTH.
- PIECES OF CLOTH on TORN CURTAIN.
- Solution (X): Match 1-6.
- NEEDLE on TORN CURTAIN; take SAIL.
- Move to Tavern.
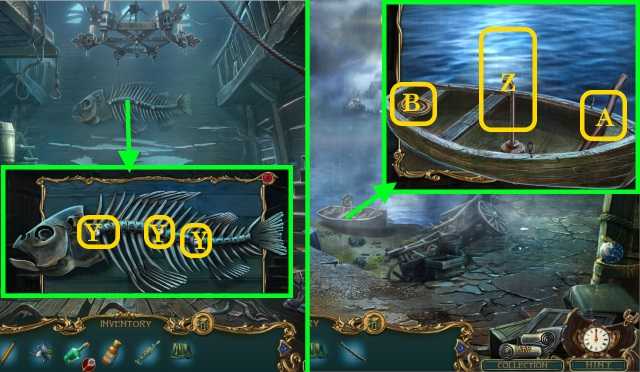
- Use SCREWDRIVER (Y); take SPINE.
- Walk down.
- Place SPINE and SHIP’S WHEEL (Z).
- Move (A) to (Z); use (B) on (Z).
- Drape SAIL (Z).

- Look (C).
- Solution (D).

- Look (E).
- Solution (F): 1-5.
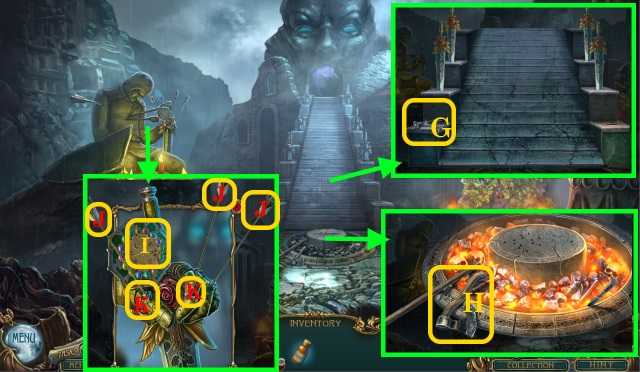
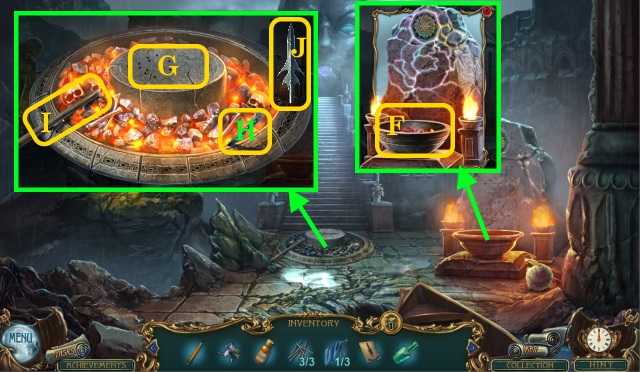
- Pick up TONGS (G).
- Take AXE (H).
- Pick up IDOL DISK (I).
- Remove (J); use TONGS (K); take STONE SWORD 1/2.
- Inspect IDOL DISK.
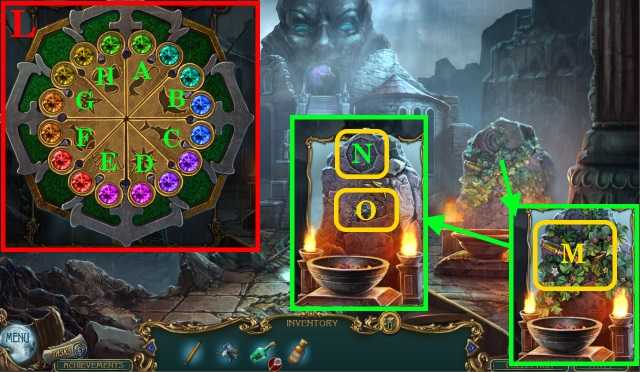
- Solution (L): B-E; F-H; E-G; E-F.
- Take IDOL DISK.
- Pick up BROKEN SWORD (M); clear.
- Place IDOL DISK (N); pick up SWORD PART 1/2 (O).
- Walk down.

- Use TONGS (P); receive SILVER 1/3.
- Walk left.
- Use AXE (Q); take SWORD PART 2/2.
- Go to Island.

- SWORD PART on BROKEN SWORD; assemble; take STONE SWORD 2/2.
- Place STONE SWORD (R).
- Solution (S): 1-6.
- Walk forward.

- Take CLOAK (T).
- Move (U) to (V); take BOOK (W).
- Inspect BOOK.

- Take CORKSCREW (X).
- Solution (Y): 6-5-4-7-8-5-2-1-4-7-8-5-4-7-8-9-6-5-4-1-2-3-6-5-8-9-6-3-2-1-4-5-2-3-6-9-8-7-4-1.
- Open; find CROWN PIECE and PAPER.
- CORKSCREW on BOTTLE; take COIN and EMPTY BOTTLE.

- Fill EMPTY BOTTLE (Z); receive WATER.
- Place COIN (A); inspect.
- Complete HOP (B); receive SILVER 2/3.
- Use PAPER and PENCIL (C); take SPEAR OUTLINE.
- Place CROWN PIECE (D); pick up SILVER 3/3 (E).
- Walk down.
- Place SILVER (F); pick up HOT METAL.
- Place SPEAR OUTLINE (G); move (H) to (G); pour HOT METAL and WATER.
- Inspect (G); move (I) to (J); take SPEAR.
- Walk forward.

- Use SPEAR (K).
- Solution (L): Thrust (A) until (B) reaches (C).
- Receive SPEARHEAD.
- Walk down.

- Speak (M).
- Select (N).

Some of the contents are from the internet, if these contents infringe on your copyrights, please contact me. All contents doesn't represent my points.