
Overview
Synopsis
This is the official guide for Memoirs of Murder: Welcome to Hidden Pines.
This guide won’t tell you when to zoom into a location; the screenshots show each zoom scene.
Hidden-object puzzles are referred to as HOPs. Only the locations of the HOPs will be shown.
Use the Map to fast travel to a location.
Author
Margie B
Quoted From
https://www.bigfishgames.com/blog/walkthrough/memoirs-of-murder-welcome-to-hidden-pines-strategy-guide-hints-cheats-codes-tips-tricks/
- Take C CUFFLINK (S).
- Look at note; take SIGN POST (T). Insert coin.
- Open; take LAXATIVE (U).
- Return to Hotel Reception.

- Use LAXATIVE when receptionist turns around (W).
- Remove cover; take BATTERIES 1/2 (X).
- Go (Y).

- Open door (Z1); play HOP; receive E CUFFLINK.
- Take WALL POSTER (Z2).
- Walk down.

- Look at newspaper; take SIGN CLUE (A).
- Walk down; pan right.
- Place SIGN POST and SIGN CLUE (B).

- Solution (C).
- Take GLOVE.
- Go to Hotel Reception.
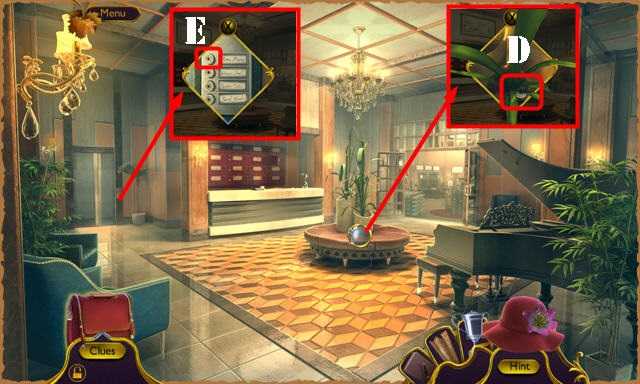
- Use GLOVE (D); receive ELEVATOR BUTTON.
- Place ELEVATOR BUTTON (E); select.

- Give BETTY’S SCARF (G). Take folder (H) and select 4x; receive INVESTIGATION EVIDENCE.
- Use BUTTERFLY NET (I); receive CHEST.
- Open door; use PIANO WIRE (J). Receive DIAMOND EMBLEM.
- Place THERMOSTAT KNOB (K).

- Solution (L-M-Nx4-L-Nx4-L-L-M).
- Receive CANNONBALL.
- Return to Gift Shop.

Some of the contents are from the internet, if these contents infringe on your copyrights, please contact me. All contents doesn't represent my points.
What's your reaction?
Very Bad
0%
Bad
0%
Average
0%
Alright
0%
Good
0%
Super
0%
Comments