
Welcome to the Moonsouls: Echoes of the Past Walkthrough
Can you confront an otherworldly foe and save your nephew?
Whether you use this document as a reference when things get difficult or as a road map to get you from beginning to end, we’re pretty sure you’ll find what you’re looking for here.
This document contains a complete Moonsouls: Echoes of the Past game walkthrough featuring annotated screenshots from actual gameplay!
We hope you find this information useful as you play your way through the game. Use the walkthrough menu below to quickly jump to whatever stage of the game you need help with.
Remember to visit the Big Fish Games Forums if you find you need more help. Have fun!
This walkthrough was created by Amanda Barrera, and is protected under US Copyright laws. Any unauthorized use, including re-publication in whole or in part, without permission, is strictly prohibited.
Amanda Barrera
https://www.bigfishgames.com/blog/walkthrough/moonsouls-echoes-of-the-past-strategy-guide-hints-cheats-codes-tips-tricks/
- Take DIORAMA FIGURINE (1/5) and CONSTELLATION DISC (F).
- Take HOLO-EMITTER CARD (G); place LENS FRAME and CONSTELLATION DISC (H).

- Solution (I).
- Take CONSTELLATION LIST.
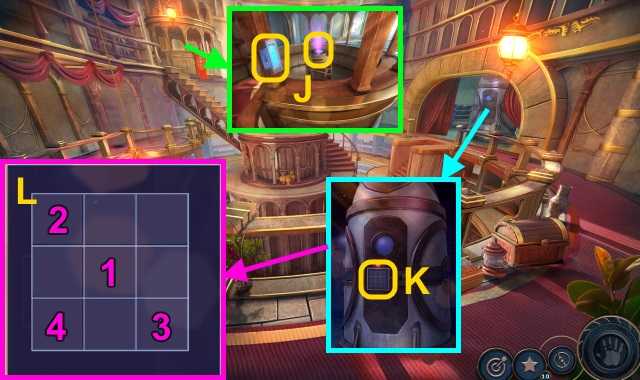
- Use CONSTELLATION LIST and HOLO-EMITTER CARD (J); play HOP. Take POD CODE.
- Use POD CODE (K).
- Solution (L).
- Open; take STRANGE ORNAMENT.
Chapter 5: The Empress

- Take MOONSOUL FLAG and MOONSOUL SHIELD (M).
- Go forward.
- Take ROPE and DULL HALBERD (N).
- Play HOP; receive POT CODE (O).
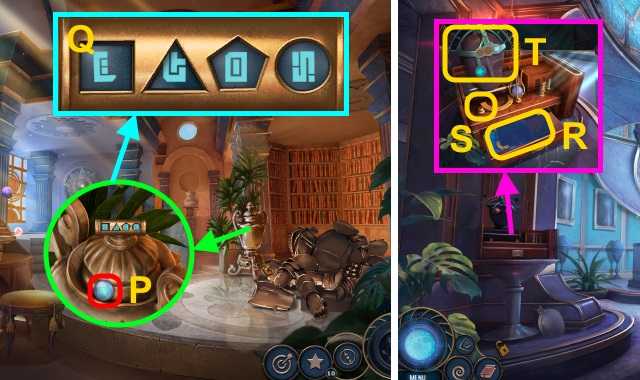
- Take MOONSOUL CRYSTAL (2/2) (P); place POT CODE.
- Solution (Q).
- Open; take GOLD ROD (1/2) and DRAWER KEY.
- Walk down.
- Use DRAWER KEY; examine (R). Use Glove Translator; take BLACKSANDS’ DIARY. Take WEAPON DIAGRAM (2/2) and DIORAMA FIGURINE (2/5). Place STRANGE ORNAMENT (S) and MOONSOUL CRYSTAL (2/2) (T); examine helmet.


- Solution (U-V).
- Receive STRANGE ORNAMENT; take CASING CODE.
- Examine; use CASING CODE (W).
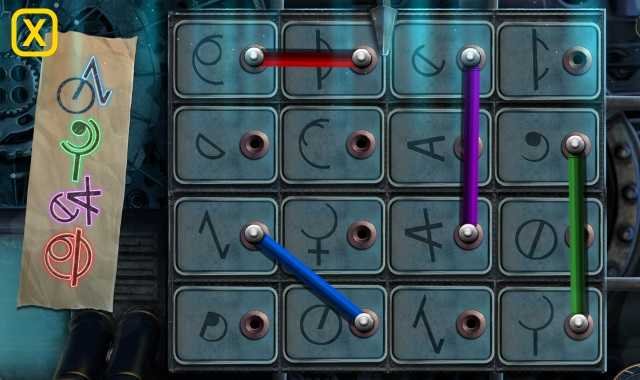
- Solution (X).

- Take INACTIVE FLIGHT SUIT (Y).
- Use MOONSOUL SHIELD (Z); use DULL HALBERD.
- Use ROPE (A); take GOLD ROD (2/2) (B).
- Walk forward.

Some of the contents are from the internet, if these contents infringe on your copyrights, please contact me. All contents doesn't represent my points.